Volume 2. Turning a Wooden Frame Loom into a Miniweaver
COMING SOON
For those who already have a wooden frame and wish to use it for finer weaving but are having challenges: with some alterations, all explained in the Volume 2: Turning a Wooden Frame Loom into a Miniweaver, you can weave some really fine weaves.
This manual will provide detailed instructions how to do it with as little effort as possible using basic tools and inexpensive materials. You will also find schematics on how to set up the frame for very fine weaving, and how to add a simple device to speed up the weaving ten fold.
With textual descriptions, over 160 photos and 15 videos, this manual will also teach how to warp the look for different densities, from as low as 8 ends per inch, to as high as 24 ends per inch for some really fine weaving. Samples of different setts are also provided for different types of yarn.
Price and publishing date will be announced in December 2025.
Important note: The frame itself must be purchased separately from any manufacturer online. The manual is best suited for a frame with top and bottom support beams (as in the photo) and no bigger than 16"c10"
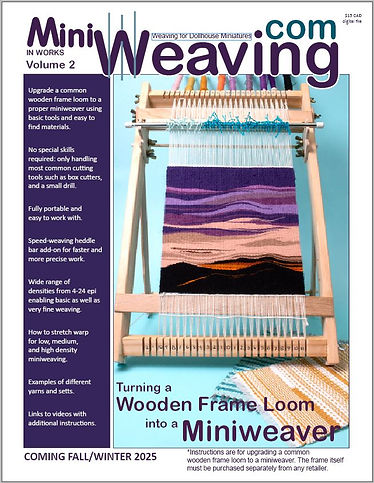


The best wooden frames for this purpose are the inexpensive ones you can find on internet from different manufacturers*. The one in these pictures is just to illustrate the type needed: it has to have top and bottom support bars and be 16" tall and 10" wide. Any other size would need adjustment of measurements.
*Please not that Miniweaving is not associated with any manufacturers and does not take any responsibility for the quality of any type of wooden frame.

The upgrade of the frame requires some basic tools and a bit of skill but nothing too excessive. If you are not comfortable with hand saws or a drill, you can mark all the pieces and get a friend to cut them and drill the holes, all together not more than 30min of work. Then you can use wood glue and put it together as per instructions.

The instructions are made with photos and explanations for each step and are easy to follow.

Warping this wooden loom for finer weaving is not difficult if you know how. I took the time to explain it in great detail not just with photos but also through very concise videos with YouTube links exclusive to the owners of this pdf manual.
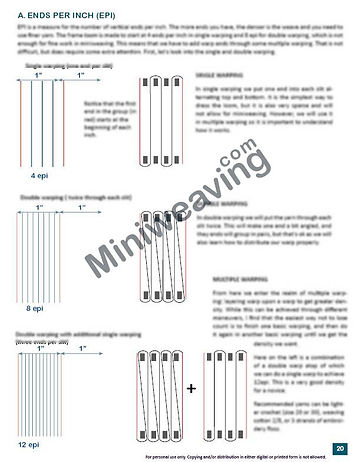
While the frame can still be warped at low density of approximately 8 ends per inch, you can go as high as 24 ends per inch, a density suitable for weaving with a fine sewing thread or one strand of embroidery floss.

Provided are examples of different densities explained in the manual, and how the weave looks like when different types of yarn are used. Just this section will save you lot of money and time in experimenting and buying unsuitable yarn.
One of the most important additions to this wooden loom is so-called heddle bar, the metal bar lifting ever other end to enable fast and even weaving. It speeds up weaving tenfold, and, when done correctly, avoids mistakes so common to individually picking each end. It is not difficult to make, and again, you can ask a friend for help if you are not handy yourself.

The frame is made to be self-standing but it can also be taken apart easily to fit into a carrier you can make yourself, or find somewhere in the secondhand store. With proliferation of laptop carrying cases, you can find one that fits the frame and have your loom on the go.

Once you upgrade your wooden frame and turn into a miniweaver, you will have enough of instructions to start your own tapestry, bookmark, miniature carpet, or any other small wooden item.
Please note that this manual is focused on how to make a weaving device. More on intermediate level of weaving will be provided in an upcoming Volume 6: Plain Weave for Miniweaving which will teach more advanced ways to weave, scheduled for early 2026
Until then you can get free additional instructions for basic weaving, in Miniweaving for Absolute Beginners .