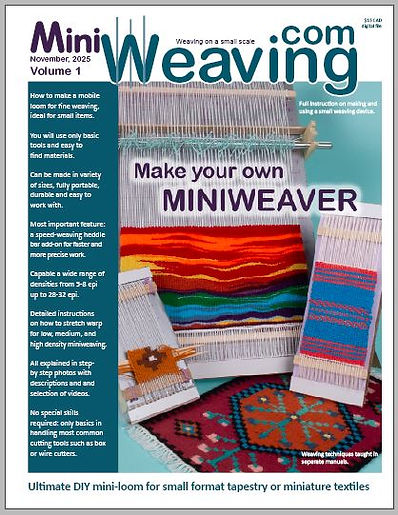
Volume 1. Make Your Own Miniweaver
Volume 1: Make Your Own Miniweaver is a digital (PDF) manual with textual, photo, and video explanations of steps needed to make a very original and versatile weaving device for small scale weaving.
Some of the advantages of this device are:
-
Made from easy to find materials from craft or dollar stores;
-
Requires only basic tools and average skill level;
-
Sturdy, durable, can last for years;
-
Easy to repair if needed;
-
Light, portable, and can be made in variety of size (maximum recommended is 6" x 12") so it can fit various carriers;
-
Has an add-on device to lift weaving ends, so for plain weaving there is no picking each end manually; speeds up weaving tenfold;
-
Can be set for low, medium, or high-density weaving and the instructions are included.
Features:
-
62 pages;
-
Over 300 photos;
-
20 concise videos for additional explanation;
-
Highly recommended if you don't have a device already as most future lectures on weaving will be done on this type of device;
-
Available in Etsy Miniweaving shop at $15 as a digital download (PDF) AS OF NOVEMBER 28, 2025.
Check video for demonstration

It leads you from finding materials, using regular tools, to warping the miniweaver properly, making and installing a heddle bar, making basic tools, and weaving with it properly.

My goal was to use only tools which are already in most households or can easily be found or substituted. No machinery, no dust, no noise.
Materials are very common and you can even use some recycled items, yet the whole structure is designed to be durable and last for many uses. My first miniweaver was made 4 years ago and it's still as good as the day I made it.
The estimated cost of materials for a fully constructed maximum size miniweaver with the heddle bar can be as low as $10 CAD* depending on the use of recycled or substitute materials which are explained in the manual. The miniweaver can also be made of all new materials at the approximate cost of $25 CAD*.
Compared to similar devices on the market with same capabilities, it's a fraction of the price with many benefits: you can make a size that fits your carrier, it is light and easily transportable, and easy to set up for basic weaving at 14 ends per inch.
* As of November 2025, in British Columbia, Canada

Each step is illustrated with a photo and explained with a text, and where needed, a video is provided.
The instructions were catered to someone with a basic skill in handling tools such as box cutter or a small hand saw.
If you are not inclined towards this type of crafting, fear not: there are really very few cuts to do and you can ask a skilled friend to pre-cut the pieces for you, and then you can assemble them at your pace: 80% of work is all gluing or taping.
You can also adjust or modify some operations if you cannot find everything you need: this method is flexible and easy to improvise.

If you are a beginner who really wish to start small, you can make a "microweaver" - the smallest version of the miniweaver, just big enough to fit into a case for your eyeglasses, or even a nail kit. Once you read the instructions for the large version, you can easily make this tiny sampler and enjoy weaving little pieces just to pass the time in a waiting room or in transportation.
There will be another full edition of Miniweaving (Volume 3) dedicated to these small devices but you need not to buy it if you bought this Volume 1. The only reason Volume 3 was made is to allow those who do not have ability to make full miniweaver to still get some simpler device made.

When I was learning to weave, one of the most difficult part to find on internet was how to set up the loom properly for fine weaving. Most explanations were geared towards experienced weavers, with terminology I did not understand.
I made sure to provide a section with set-up instructions that is well illustrated and explained in layperson language so you can build your weaving foundations. Once you read through this section you will be able to:
-
Choose the density that suits your project (low, medium, high):
-
Warp the loom:
-
Properly distribute the yarn for even weaving even when you use a very high density.

And I also provided step by step instructions, in photos and videos, on exact procedure to warp the loom in these settings (low, medium, high). Witnessing the attempts of enthusiastic weavers to use very high density and getting hopelessly stuck, I spared no time to make photos of every detail, and include a video which will lead you through these tricky stages.

Then you will have some samples of setts for different types of recommended yarn to use, so you don't have to waste time and money experimenting with materials unsuitable for miniweaving. I spent hundreds of dollars buying yarn that at the end didn't work out and just those savings you could make will justify spending money on this manual.

Another absolutely great addition to small weaving devices is a HEDDLE BAR - that mechanism you see at the top which will enable you to weave like a pro, lifting the ends alternately so you don't have to pick each and every one.
I provided great detail on measurements and ways to make it so it is not a big chore, but it will speed your weaving tenfold without making mistakes.

There is also a segment with a video and series of photos showing you how to properly use miniweaver for basic weaving.

There are also instructions for necessary tools so once you made them you can start weaving properly.
Again, all the materials are easily sourced out and require minimum tools and just a moderate level of skill.
For some additional tools you can check Miniweaving for Absolute Beginners which is free for viewing.

I also included some neat ideas on storing and carrying your miniweaveing with you anywhere for easy set-up and work.
Made on miniweavers


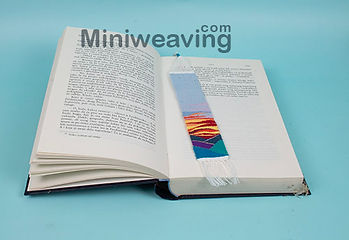

Mini tapestry
Bookmarks
Coasters
For illustration of what a miniweaver can do. Instructions for weaving these items will be provided in future Miniweaving manuals.

Miniature rugs
Buy Volume 1: Making Your Own Miniweaver

COPYRIGHT NOTICE Copyrights by Miniweaving Studio, 2025 All rights reserved. For personal use only. Copying and/or distribution of this manual in its entirety or in portions, including video links, in either digital or printed form is not allowed and will be considered a violation of copyrights.
Buy your PDF digital file of the manual on Etsy, at $15 CAD per download, starting November 28, 2025, so you can start making your first miniweaving device. By the time you finish it and practice the basics on it, you will be ready for next edition in making.
If you still have question, don't hesitate to contact me. (See Contact page.)
NOTE TO FUTURE MINIWEAVERS:
I am immensely proud of my work on the miniweaver. It took lot of time, money, and thinking to create it and then explain it. I ask only one thing of you: please do not share any of the details of these methods on social media, even through your own photos which may reveal the materials or mechanism of the miniweaver. I have no problem with you sharing the final results of your miniweaving, or sharing details with your friends at your home, but putting detailed images on social media will infringe on my patent copyrights and could also motivate unethical use by “content creators” who put no work other than perusing social media and stealing hard work of others. We can stop this only if we are careful what we place in public view. I thank you for that consideration and for supporting true creators.